Thank you for subscribing to The Modern Entrepreneur 😀
Many e-mail and Internet companies use automated programs to block spam. Sometimes these programs can get a little aggressive and even end up blocking the email that you actually want to receive. I know I've had a few shocks when scanning my spam folder. Email whitelisting can help protect the emails you want to receive!
Email Whitelisting Helps To Ensure You Receive Emails From The Modern Entrepreneur.
You can protect your email delivery by adding the corresponding The Modern Entrepreneur email addresses to your email whitelist to ensure that you receive the content and updates you've requested. A whitelist is a simple way to let your provider know the e-mail addresses or domain names that you trust and would like to receive message from.
Whitelist us now, before your delivery is interrupted.
Whilst each email system has it's own way of managing whitelists and they can change over time, you can find instructions for some of the more popular ones below. If yours isn’t here, please contact your email providers customer service for their instructions.
Gmail
- In your inbox, locate an email from contact@themodernentrepreneur.com (for example the welcome mail that probably linked you here).
- Drag this email to the “primary” tab of your inbox.
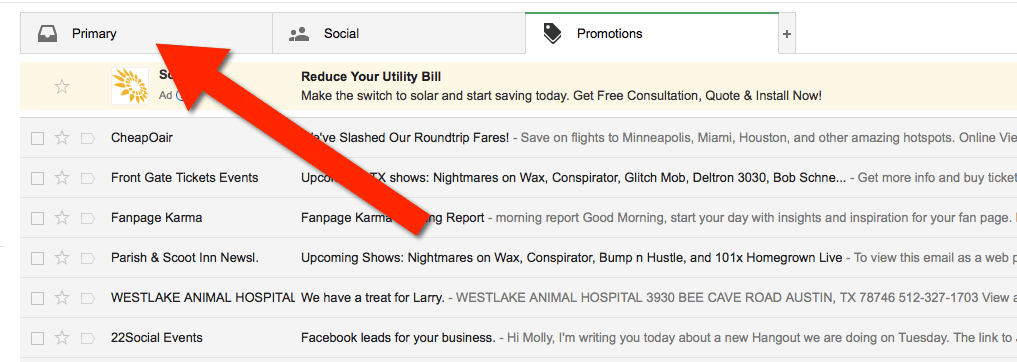
- You’ll see that our emails will go to your primary folder in the future!
iPhone


Yahoo! Mail
When opening an email message, a “+” symbol should display next to From: and the sender’s name. Select this and an “Add to contacts” pop-up should appear. Select “Save”:
Android
Open the email in your Gmail app. Tap the contact icon to the left of the sender’s name and email address.Tap “Ok” on the “Add contact” pop-up box.
Enter the sender’s name in the “First name” field.Enter the sender’s email address in the “Email” field.
Tap “Save” to save the address.


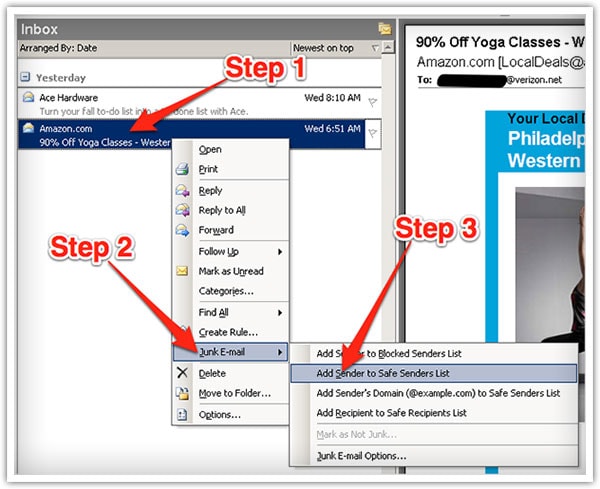
Outlook 2003 (and higher)
Right-click on the message in your inbox.
Select “Junk E-mail” from the menu.
Click “Add Sender to Safe Senders List.”

AOL
Log into your account and click the “Settings” link.

On the “Settings” page, select “Spam Settings.”
Choose “Allow mail only from addresses I specify” on the drop-down menu.
Enter the sender’s email address.
Click the “Add” button to add them to your sender list.
Click “Save” to save your changes.

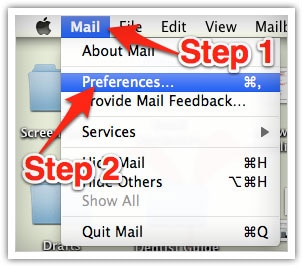
Mac Mail
Select “Mail” and “Preferences” from the top menu.
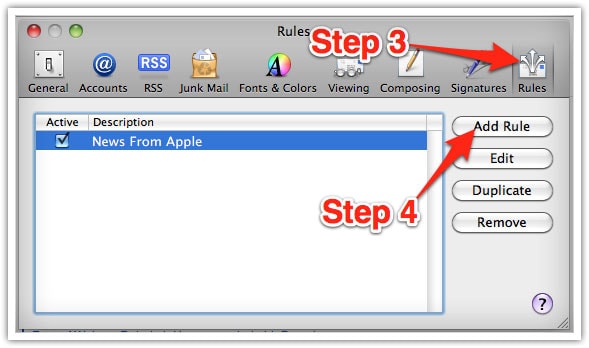
In the “Preferences” window, click the “Rules” icon.
Click the “Add Rule” button.
In the “Rules” window, type a name for your rule in the “Description” field.
Use the following settings: “If any of the following conditions are met: From Contains.”
Type the sender’s email address in the text field beside “Contains.”
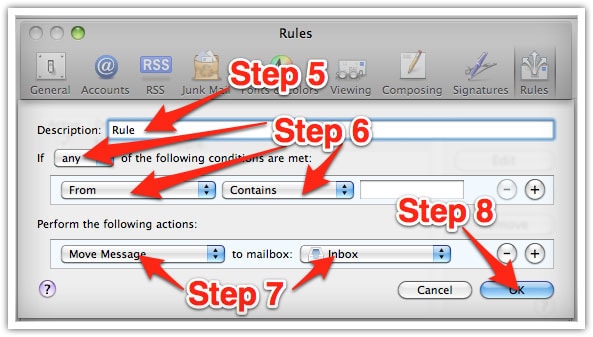
Select “Move Message” and “Inbox” from the drop-down menus.Click “Ok” to save the rule.
Outlook 2003 & Later
Right-click on the message in your inbox.
Select “Junk E-mail” from the menu.
Click “Add Sender to Safe Senders List.”
Yahoo
Log in to your account and click the “Options” link.
Select “Mail Options from the drop-down menu.

In the “Options” tab, select “Filters from the left menu.
Click the “Add Filter” button in the top bar.
Type a name for your filter in the “Filter name” field.
Select “contains” in the “sender” drop-down menu.
Type the sender’s email address in the “sender” text field.
In the “Move to Folder” drop-down menu, select “Inbox.”
Click the “Save Changes” button in the top bar to save the filter.

Mac Mail
Select “Mail” and “Preferences” from the top menu.

In the “Preferences” window, click the “Rules” icon.
Click the “Add Rule” button.

In the “Rules” window, type a name for your rule in the “Description” field.
Use the following settings: “If any of the following conditions are met: From Contains.”
Type the sender’s email address in the text field beside “Contains.”
Select “Move Message” and “Inbox” from the drop-down menus.
Click “Ok” to save the rule.

Thunderbird
Open the email message.
Click the blue star next to the sender’s name and address to add them to your address book.

Windows Live Mail
Click the Windows Live Mail icon in the top left corner of the window.
Select “Options” in the menu.
Click on “Safety Options” in the next menu.

In the “Safety Options” window, click the “Safe Senders” tab.
Click the “Add” button.
Enter the sender’s email address in the new window that pops up.
Click “Ok” to add sender.
Click “Ok” in the “Safety Options” window to save your changes.
